Hello, readers! Although we are no longer posting new items on our blog, we are keeping it available so you can browse through our past posts. Thanks for visiting!

Apr 28, 2011

{Annie's ETSY Shop SALE!}

Or better known as:

"My Husband Lost His Job Over The Easter Holiday Weekend And We Would Really Like To Be Able To Pay Our Bills (and not eat Ramen Noodles everyday) This Month - SALE!"

*sigh*

Sad, but true.  It's happened to too many people lately and it's horrible each time, and now it has hit us as well.

But.... there's GOOD NEWS FOR YOU, my friends!

I'm having a FREE SHIPPING SALE in my personal Etsy shop!
And none of the prices were raised to fool you, either.  It's a genuine, honest-to-goodness free shipping SALE.
Some prices have even been reduced!
(free shipping is on all U.S. orders, but there is reduced International shipping as well!)

(SugarPlum mini hoop art)

Have you been wondering what to give your mom for Mother's Day?  Check out my shop!  You may just find an embroidery piece that would be perfect.
 
(Olive You felt+floss hoop art)
 

And, if you purchase this week, there's time to ship it to you before Mother's Day! (which is Sunday, May 8th)

(Weed Walker hoop art)
 
I would also be more than happy to gift wrap your item(s) and ship it wherever you would like it to go!  Just let me know in the "notes to seller" section when making your purchase.

Thank you for your support!

-Annie

(Unfortunately, this free shipping sale does not include items in our PeppermintPlum Etsy shop at this time.  Only my personal crafty shop JammerSage)

Pin It

Apr 26, 2011

{White Pitchers with Flowers}


I've been noticing a trend with myself lately...
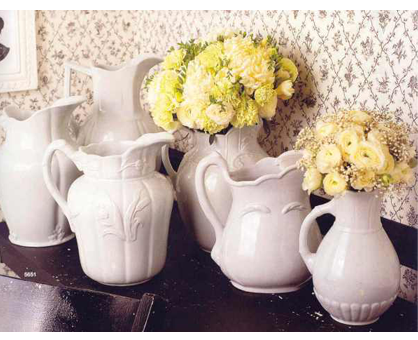
whenever I see flowers, or branches, or berries, or grasses in white pitchers I swoon. 

There's something so classic, alive, so country-fresh about them that I can't help but love.

I've been stockpiling pictures (thanks Pinterest!) that I've come across lately, so I thought I'd share a few of my favorites: 

Little Big Nest


madiganmade

my home ideas

(photo credit unknown)

...and the one that probably started my obsession:

cg daffodils and candlesticks
Centsational Girl

Aren't those all fabulous?!

I have always loved white pitchers and creamers, and I already have a small collection of them.

...but, unfortunately, I also have severe allergies to pollen,
so I must settle for fake stuff in mine.


Okay, so maybe that last one isn't a pitcher.....or a creamer.
Yes, folks...it's a gravy boat.

So I guess I {heart} gravy boats with flowers in them, too.

-Tammy


Pin It

Apr 24, 2011

{Happy Easter}


Pin It

Apr 22, 2011

{Spring Fever}

Hey, everyone!

Tammy is sharing a few "Shop Your Own House" ideas over at Creation Corner today...
monogram

Be sure to check it out!


Tasha's got a great blog with some really cool guests and giveaways this week.  You wont want to miss it!

 
Pin It

Apr 20, 2011

{the GRASS grows GREENER still}

Last week we got to share this tutorial and free printable with the lovely readers at Mine For The Making (thanks Kara!) and now we would like to share it with you!


This free printable was created for you using part of a song called
which we learned when we were children in our church Primary class.

It's a reminder to us all that no matter how small we may think we are as individuals, we can still make a big impact and have a positive influence on everything and everyone around us.

"I'm small, I know, but wherever I go... the grass grows greener still."

You may have learned it as the "fields grow greener" instead of grass, but this is how we learned it and how it will always be in our minds.

Here is how we decided to turn this fabulous quote into a piece of framed art!


You can print your quote as large or as small as you would like.
Ours is printed on a regular-sized piece of cardstock and will fit perfectly in this 11x14 frame with an 8x10 opening.


Now it's time to add the grass!

We used a strip of moss from a "moss roll" that we found at JoAnn's last year.
The moss is a pretty, green color and makes for great grass.  Any type of green moss you find will work perfectly.


Using your hot-glue gun, glue the moss to the bottom of the frame.
We removed the glass from the frame so the moss is hot-glued right onto the mat.


Be sure to use smaller pieces of moss to fill in any thin spots so the white doesn't show through too much.  We want a nice, thick strip of grass!

Now it's time to embellish!


We made some fabric rosettes out of color-coordinating fabric strips.
There are so many awesome fabric rosette tutorials on the web right now and they are super-simple to make!


Just glue on your added bits of cuteness and it's ready to hang!

A perfect spot of SPRING to be admired all year long.

**********

We made this version in pink, aqua, greens and purple:


As well as this version in yellow, blue, greens and orange:


If you want to print your quote the same size as ours, here's a few tips on how to get it centered and printed from your Paint program:

First, right-click on the quote image above that you want and save it to your desktop.
Then, right-click on your saved image and open it in the Paint program.


Next, you will need to setup the page so it prints just right.
Go up to the top and select FILE, then down to Page Setup and you will see this screen:

Change the Orientation to Portrait.
Remove any check-marks in the Centering section.
Change the margins to show
Left: 1  Right: 1
Top: 0.5  Bottom 0.5
Then change the Scaling to Fit To: 1 by 1 page

The gray box on the left will show you how your image will print.
This way, you will have enough space around the quote to place it directly behind the picture frame mat and have enough open space at the bottom to add the grass and embellishments.

Then hit OK to save the changes and print it out!


We hope you enjoy this free printable and have a great time making your own!

-Annie + Tammy

Pin It

Apr 18, 2011

{sewn BUNNY candy pouch}


I decided to use my original sewn paper candy pouch tutorial to make something just as cute (if not cuter) for Easter!

This really is such a simple way to make a BIG statement.
Who wouldn't love to tear right into this {chocolate} bunny to get to the treats hidden inside?


I used brown craft paper here and inked it up with distressing ink to make it look more chocolatey.  The googly eyes definitely add an element of cuteness, don't you think?


I just drew this bunny free-hand, but I'm sure you could find any shape you want to use to copy or trace for your candy pouch. An egg-shaped pouch would be cute, too!
This little guy is about 9 inches tall and is filled with jelly beans.

Perhaps the Easter Bunny reads this blog and will decide to leave a few sewn candy pouches in YOUR Easter baskets this year!

* * * * *

You can find my original tutorial on how to make the candy pouches here:


-Annie


UndertheTableandDreaming 

*click HERE to see the awesome linky parties we participate in!*


Pin It

Apr 16, 2011

{A Day of Giveaways!}

We're excited to be participating in
Mine for the Making's

Hop on over to check it out!
Be sure to enter all the fun giveaways…

You could even win one of these
Sweet Strawberry Garlands
 

-Annie and Tammy

Pin It

Apr 14, 2011

{SPRING FLING - Feature}


Today, we have the honor of being a guest host at
Mine For The Making!

A big thank you to Kara for allowing us to play at her "house" today!  :)

Here's a sneaky-peeky of what we made:

Oooh, exciting!

Click HERE to find the full tutorial and to get the free printable.

-Enjoy


Pin It

Apr 11, 2011

{PINWHEEL garland - Tutorial}


What do you think of when you see pinwheels?
I think of Spring and Summer.
Warm, windy days.
Backyard BBQ's....Lounging and laughing.
Basically.... FUN!

I wanted to share with you this simple tutorial on how to make your own

PINWHEEL GARLAND!

It would be such a cute addition to your outdoor garden party, baby shower, bridal shower, even as wedding decorations in matching wedding colors... perfect!
Here's what you need to get started:

The next steps are pretty much explained in the following photos:


I punched small holes in 2 of the corner points on each pinwheel and strung them onto a length of jute rope:

That's all there is to it!

My home decorations don't exactly mesh with Springy colors, but I'm loving the pinwheel garland just the same.

I hope you enjoy making your own
PINWHEEL GARLAND!
Feel free to link up a photo in the comments if you make one.
I definitely want to see it!

-Annie

Click HERE to see all of the lovely linky parties we participate in!


Pin It
Related Posts Plugin for WordPress, Blogger...